Test Suite Configuration
XLT uses Java properties files to configure the main components of the load generation environment and your load test suite. The basic characteristics and syntax of this format are also valid for the XLT properties files.
When reading the properties, XLT distinguishes between load test mode and development mode. As its name implies, the load test mode is active when test cases are executed as load tests by the XLT master controller/agent controller. When test cases are executed as JUnit tests in Eclipse or any other JUnit test runner, they run in development mode. Even though the development mode is mainly used for test case development, it will also be active if your test suite is meant to perform an automated functional test manually triggered from time to time or integrated in a build process.
XLT makes use of a hierarchical file system so that properties can be distributed to several files with different priorities. Properties from different files complement each other. Furthermore, properties from a file with higher priority can overwrite identical properties from a file with lower priority. This mechanism allows general default values to be specialized for different test run scenarios or projects. It’s also possible to prepare several configurations in different files and activate one of these configurations by switching between the files.
All properties are read from the <testsuite>/config/ directory. The existing properties files are listed below, sorted by priority from lowest to highest. The following sections outline the settings relevant to load testings, as contained in these property files:
<testsuite>/config/default.properties- Default Configuration<testsuite>/config/project.properties- Test Project Configuration<testsuite>/config/test.properties- Load Test Profile Configuration<testsuite>/config/dev.properties- Development Environment Configuration
Default Configuration
The properties in default.properties represent the general XLT framework settings that are all set to their respective default value. They are neither specific for a single test project nor for a single test run.
If you need to change one of these properties, copy it to the project.properties or test.properties and change the value there to overwrite the value in default.properties. Each of the properties in default.properties can be overridden since they have the lowest priority.
When updating XLT to a newer version, it is recommended that you update the default.properties file in your test projects as well because newly available properties can be found there, along with their default value and description.
The properties listed in default.properties are separated into the following groups (please look into the file itself for more details):
- HTTP/Protocol Settings (configuring a proxy, request retries, URL filters…)
- Browser Emulation Settings
- JavaScript Settings
- CSS Settings
- Test Data Management Settings
- Result Settings (enabling and configuring page output to disk)
- Test Execution Settings (configuring think time, test abortion criteria)
- Script Engine Settings
- Real-Time Reporting Settings (Graphite configuration)
- Miscellaneous Settings
Result Directory Location
Specifies the directory location where you want to store load test results. Normally, there’s no need to change it.
com.xceptance.xlt.result-dir = <directory path>
Proxy Configuration
XLT is able to route traffic through an HTTP proxy. Specify the host and port of the proxy server and whether it should be used at all. If the proxy requires user authentication, make sure to provide the credentials needed. You may also configure a list of hosts that can be used directly, thus bypassing the proxy. Note that the host definitions are interpreted as regular expressions so ensure proper use of escape characters.
com.xceptance.xlt.proxy = true
com.xceptance.xlt.proxy.host = 127.0.0.1
com.xceptance.xlt.proxy.port = 8888
com.xceptance.xlt.proxy.userName = myUserName
com.xceptance.xlt.proxy.password = myPassword
#com.xceptance.xlt.proxy.bypassForHosts = localhost 127\\.0\\.0\\.1
Error Behavior
Specifies the framework behavior in case of an error, that is whether or not the framework should abort a transaction if any of the following occurs:
- While loading a page - If an HTTP error occurred while loading a page.
- Page resource unavailable - If an HTTP error occurred while loading a resource embedded in a page.
- Java script error - If a JavaScript error occurred.
- Agent termination in case of server errors - Maximum number of errors allowed before an agent terminates, which helps to automatically stop unobserved, long-running test cases in the event of severe error conditions, such as unavailability of the system under test. The number of errors specified here is the error count per running agent controller.
com.xceptance.xlt.stopTestOnHttpErrors.page = <true/false>
com.xceptance.xlt.stopTestOnHttpErrors.embedded = <true/false>
com.xceptance.xlt.stopTestOnJavaScriptErrors = <true/false>
com.xceptance.xlt.maxErrors = <number of errors per agent controller>
Think Times
To specify the think time between two subsequent actions or transactions, use the properties below. If a random think time is needed, set the appropriate deviation to a value greater than 0. It specifies the maximum deviation from think time in milliseconds. The respective value is added to or subtracted from the think time using a pseudo-random, uniform distribution.
com.xceptance.xlt.thinktime.action = <time in [ms]>
com.xceptance.xlt.thinktime.action.deviation = <time in [ms]>
com.xceptance.xlt.thinktime.transaction = <time in [ms]>
com.xceptance.xlt.thinktime.transaction.deviation = <time in [ms]>
The think time configuration might look like this, for instance:
com.xceptance.xlt.thinktime.action = 100
com.xceptance.xlt.thinktime.action.deviation = 50
com.xceptance.xlt.thinktime.transaction = 0
com.xceptance.xlt.thinktime.transaction.deviation = 0
This sets the action think times between 50 and 150ms and no transaction think time whatsoever.
Note that the deviation has to be smaller than the specified base think time.
Automatic Request Retry
If a request has failed, XLT may automatically retry that request, provided that the error indicates a temporary issue (e.g. for a SocketException, which is probably just a temporary network issue). This feature can be enabled or disabled altogether, it may only be effective for idempotent requests (i.e. GET, PUT and DELETE) or also for non-idempotent requests (i.e. POST and PATCH), and you may also tune the retry count:
com.xceptance.xlt.http.retry.enabled = true
com.xceptance.xlt.http.retry.nonIdempotentRequests = true
com.xceptance.xlt.http.retry.count = 3
Please note that failed requests will not appear in the report’s Errors section if a retry was successful.
Automatic Transaction Run Time Limit
If your test case is somewhat random (for example, it browses through a shop’s catalog until it finds a product in stock), it might be beneficial for tests to have an automatic run time limit per transaction, the so called transaction timeout. This will prevent infinite loops in case of a certain error condition that was not covered yet in the test case code. Enable the transaction timeout in the XLT configuration:
## Whether the framework should abort a transaction (defaults to false)
## if it exceeds a certain maximum run time [ms] (defaults to 15 min).
com.xceptance.xlt.abortLongRunningTransactions = true
com.xceptance.xlt.maximumTransactionRunTime = 900000
Support for HTTP/2
Nowadays more and more servers talk HTTP/2, however, HtmlUnit does not support HTTP/2 yet. Until proper support is available out-of-box, XLT provides an alternative web connection that uses the OkHttp HTTP client which is able to talk HTTP/2. The new web connection tries to mimic the original web connection, but the browser specifics may not be emulated as accurate. Furthermore, the ability to reconfigure the web connection according to the current web client options during the test scenario is limited only. That’s why XLT still uses the standard HtmlUnit web connection by default.
If you want to try out testing with HTTP/2, you first need to enable that feature by setting the following property in the configuration of your test suite:
com.xceptance.xlt.http.client = okhttp3
By default, the client will talk HTTP/2 or HTTP/1.1, whatever the server wants. For testing purposes, you can disable HTTP/2 altogether:
com.xceptance.xlt.http.client.okhttp3.http2Enabled = false
You might want to know which protocol was eventually negotiated between the HTTP client and the server. Please consult the result browser which will display the protocol version used on the Request/Response Information tab.

XLT Result Browser displaying the used protocol version
Test Project Configuration
To configure your test project, edit the file project.properties. The first and most important property is the reference to test.properties that should be applied. Changing the value for this property, you can easily switch between different load test profiles configurations.
By default, the file stores the test case mapping that maps the test case class onto a load test name. The load test name will be referenced later in the load test configuration.
It’s also the best place for all your test case-specific custom properties, such as URLs, credentials, search phrases, or any other data you want to extract from your test cases as properties.
Test Properties File
XLT permits to prepare and use multiple test.properties files for easy maintenance of test setups. This facilitates switching between test setups and prevents configuration errors. This property doesn’t allow the use of a path-specific file name. The test definition files reside in the same directory as the project.properties file.
com.xceptance.xlt.testPropertiesFile = <filename>.properties
As an alternative to configuration editing, it is also possible to pass the name of the test-specific configuration file on the mastercontroller’s command line:
mastercontroller.sh -auto -testPropertiesFile <filename>.properties
Test Project Name
If you are busy with different load testing projects at the same time, you might also have different test reports open in the browser. Since they all look alike, it happens too easily that you look at the wrong report by mistake. That’s why you should name your projects, like this:
com.xceptance.xlt.projectName = Posters
If a project name is set, this name will be rendered prominently into the header of each report page (and also the page title).

Project name in the page header
Test Class Mapping
Specifies which test IDs should be used by XLT and, more specifically, which test ID uses which test case implementation. That’s why you have to specify the fully qualified class names of your tests here. Note that you can map the same class to multiple load test names if needed. This is extremely useful when you want to run the same test case in different configurations.
com.xceptance.xlt.loadtests.<name>.class = <fully qualified class name>
A test class mapping might look like this:
com.xceptance.xlt.loadtests.TVisitor.class = com.xceptance.xlt.samples.tests.TVisitor_US
com.xceptance.xlt.loadtests.TJSVisitor.class = com.xceptance.xlt.samples.tests.TJSVisitor_US
Test Class-Specific Settings
You can define project-wide settings that are test case-specific but not test run-specific by using the following syntax:
<fully-qualified class name>.<property-name> = <value>
For example:
com.xceptance.xlt.samples.tests.shop-url = http://localhost:8080/posters/
com.xceptance.xlt.samples.tests.TAuthor.username = username
com.xceptance.xlt.samples.tests.TAuthor.password = password
com.xceptance.xlt.samples.tests.webdriver.TAuthor.write-count = 2
Load Test Profile Configuration
The settings required to configure a particular load test profile are collected in a separate file. See Load Configuration or the properties file itself for details of the available load test settings, what they mean and how to define values for them.
The default name of this file is test.properties. However, it’s variable and several files with different load test profile configurations may exist such as test-target-load.properties and test-2x-target-load.properties. This way, many configurations can be defined and prepared in advance and used as needed. You switch between these files by changing the property com.xceptance.xlt.testPropertiesFile in the project.properties file.
Load test profile configurations are done inside your test property file, which is named test.properties by default. Using the syntax below, you can define test ID, the number of virtual users, and all other load test-specific settings of tests meant to run in parallel agents:
com.xceptance.xlt.loadtests.<testID>.<setting> = <value>
For <testID>, use any appropriate name. The following table lists all supported values for <setting> - required settings are displayed in bold face:
| Setting | Description |
|---|---|
| class | Fully qualified class name of the test case (REQUIRED if not specified in project.properties) |
| users | Number of threads that run the test in parallel (REQUIRED), may be a load function |
| iterations | Number of iterations per thread |
| arrivalRate | Number of transactions per hour, may be a load function |
| initialDelay | Number of seconds to wait at the beginning |
| warmUpPeriod | Number of seconds to run without performing measurements |
| measurementPeriod | Number of seconds to perform measurements (REQUIRED) |
| shutdownPeriod | Number of seconds to continue without performing measurements |
| rampUpPeriod | Number of seconds to steadily increase the configured load parameter |
| rampUpStepSize | Value to step-wise increase the configured load parameter during ramp-up |
| rampUpSteadyPeriod | Number of seconds between ramp-up steps |
| rampUpInitialValue | Initial load when starting ramp-up |
| loadFactor | A factor to be applied to users (and arrivalRate if defined). Use this value to scale the load up/down. |
A sample load profile configuration is given below:
com.xceptance.xlt.loadtests = TAuthor
com.xceptance.xlt.loadtests.TAuthor.users = 5
com.xceptance.xlt.loadtests.TAuthor.iterations = 100
com.xceptance.xlt.loadtests.TAuthor.arrivalRate = 3600
com.xceptance.xlt.loadtests.TAuthor.initialDelay = 0
com.xceptance.xlt.loadtests.TAuthor.warmUpPeriod = 30s
com.xceptance.xlt.loadtests.TAuthor.measurementPeriod = 10m 0s
All time period values can be specified in one of the following formats:
- total number of seconds: 1234s or 1234
- natural style: 0h 12m 0s, 0h 12m, 12m 0s, or 12m
- digit style: 1:23, 01:23, 0:1:23, or 0:01:23
If you want to run several test cases simultaneously, specify the test case names as value for the property com.xceptance.xlt.loadtests in form of a space-separated list:
com.xceptance.xlt.loadtests = TAuthor TVisitor TCrawler
com.xceptance.xlt.loadtests.TAuthor.users = 5
com.xceptance.xlt.loadtests.TVisitor.users = 3
com.xceptance.xlt.loadtests.TCrawler.users = 4
Sample Configurations
User Count Model With Constant Load Profile
com.xceptance.xlt.loadtests.TAuthor.users = 5
Runs exactly 5 users right from the beginning.
User Count Model With Ramp-Up Load Profile
com.xceptance.xlt.loadtests.TAuthor.users = 50
com.xceptance.xlt.loadtests.TAuthor.rampUpInitialValue = 10
com.xceptance.xlt.loadtests.TAuthor.rampUpPeriod = 5m
Runs exactly 50 users, but ramps up the user count from 10 to 50 over a period of 5 minutes.
User Count Model With Variable Load Profile
com.xceptance.xlt.loadtests.TAuthor.users = 0/5, 1h/50, 2h/50, 2h/100, 3h/20
Runs the TAuthor scenario with a variable number of concurrent users (5 → 50 → 100 → 20).
Arrival Rate Model With Constant Load Profile
com.xceptance.xlt.loadtests.TAuthor.users = 5
com.xceptance.xlt.loadtests.TAuthor.arrivalRate = 100
Runs the TAuthor scenario exactly 100 times per hour with at most 5 concurrent users.
Arrival Rate Model With Ramp-Up Load Profile
com.xceptance.xlt.loadtests.TAuthor.users = 5
com.xceptance.xlt.loadtests.TAuthor.arrivalRate = 100
com.xceptance.xlt.loadtests.TAuthor.rampUpInitialValue = 50
com.xceptance.xlt.loadtests.TAuthor.rampUpSteadyPeriod = 1m
com.xceptance.xlt.loadtests.TAuthor.rampUpStepSize = 10
Runs the TAuthor scenario exactly 100 times per hour with at most 5 concurrent users, but starts with an arrival rate of 50 per hour and increases it by 10 every minute until the target level of 100 is reached.
Arrival Rate Model With Variable Load Profile
com.xceptance.xlt.loadtests.TAuthor.users = 5
com.xceptance.xlt.loadtests.TAuthor.arrivalRate = 0/50, 1h/100, 2h/200, 3h/150
Runs the TAuthor scenario with a variable arrival rate (50 → 100 → 200 → 150) and with at most 5 concurrent users.
Arrival Rate Model With Ramp-Up Load Profile and Load Factor
com.xceptance.xlt.loadtests.TAuthor.users = 5
com.xceptance.xlt.loadtests.TAuthor.arrivalRate = 100
com.xceptance.xlt.loadtests.TAuthor.rampUpPeriod = 5m
com.xceptance.xlt.loadtests.TAuthor.loadFactor = 2.4
Runs the TAuthor scenario exactly 240 times per hour with at most 12 concurrent users, but ramps up the arrival rate from 1/h to 240/h over a period of 5 minutes.
Development Environment Configuration
The file dev.properties contains development mode settings. Use this file to modify the configuration so that it suits your needs during test case development, that is when you create and debug test cases from within your IDE.
It’s read in development mode only, but not during load testing. For development mode, the values in this file have highest priority. Any setting defined here will overwrite the corresponding setting from the other properties files: default.properties, project.properties, and the test run-specific properties file, e.g. test.properties.
If the default values suffice as development settings for your test suite, dev.properties can also be empty.
Specific Settings for Development Purposes
Random initial value: While stabilizing tests, you may encounter an error that to be analyzed needs the test to re-run exactly as before. This means, also randomized steps of your test (e.g. which category is clicked, which product is viewed) should be the same. To this end, you may set the random init value manually, to the value that is displayed in the result browser if you click the title of the test scenario:
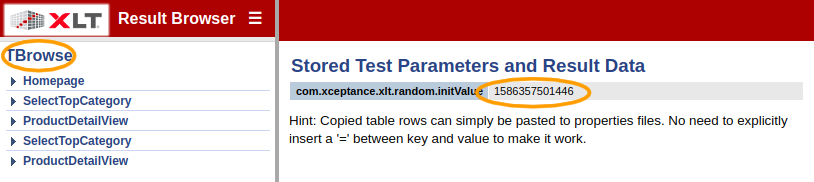
Result browser overview page
com.xceptance.xlt.random.initValue = 1586357501446
Opening Result Browser Automatically: When running a test case from within your IDE, XLT prints the path to the corresponding result browser to the console for easy copy&paste into a Web browser. XLT may even open the result browser directly in your default Web browser - just set the following property in your dev.properties file:
com.xceptance.xlt.results.openResultBrowser = true
Secret properties
XLT supports defining secret properties that can be used in test cases, but will be masked in test results and and report output. This feature is intended for use cases where users executing and reviewing test cases are not supposed to see certain properties (e.g. login credentials).
You can define secret properties in one of two ways:
- Properties prefixed with
secret.are defined as being secret, no matter where they are defined. - Properties defined in the file
secrets.propertiesare always prefixed withsecret.internally, if they don’t already have that prefix.
Secret properties are available to test cases under their full name (including the secret. prefix), as well as without that prefix: secret.property can be accessed as secret.property (if you want to ensure, that it was defined as secret) and property (in order to keep secret properties compatible to existing test case code).
Note
The usual lookup rules for project/test class/user-specific property names apply for secret properties as well. See Resolving Property Keys for further details.
Danger
XLT CANNOT prevent test code from leaking secret properties. DO NOT output the values of secret properties in any form available to the user from your own test code (e.g. as debug messages)!
Requesting secret properties
Test cases may wish to ensure that certain properties are only used if they are configured as secret properties (e.g. to prevent leaking credentials in reports circulated to a wider audience). If the test code requests the property with the secret. prefix, the corresponding public property will NOT be returned, even if it exists. While this does not prevent the public property from being configured and possibly leaked in the test results, it does ensure that the test will not use this property, most likely causing it to fail and making the result useless anyway.
Including Additional Property Files
When dealing with different test environments, different load profiles, and/or different test data at the same time, managing different combinations of configuration settings can be challenging. To make this easier and less error-prone, properties can be included as a set. This allows to:
- predefine the configuration of certain aspects with certain values in separate files, and
- reuse and combine the predefined settings as needed with a single statement.
To this end, the files default.properties, project.properties, test.properties (no matter if it’s been renamed), and dev.properties can include further property files. Each of these additional property files has to be placed within your test suite and the name of all these files must end with .properties. Any included file may also define includes itself.
How to Include Other Properties Files
You can include another property file by adding the special include property
com.xceptance.xlt.propertiesInclude.<index> = <relativePathToPropFile>
where <index> denotes an integer number. The value of the include property is the relative path to the file to include, starting from the directory in which the current file is located. You can also include all properties files in a certain directory at once by specifying the relative path to that directory:
com.xceptance.xlt.propertiesInclude.<index> = <relativePathToDir>
In both cases, the relative path may also go upwards using “..” as long as you don’t leave the config directory of the test suite.
Include properties are treated like normal properties. Thus, if there are two include properties having an identical index, only one of them will be applied.
Processing Order of (Included) Property Files
default.properties, project.properties, test.properties, and dev.properties form a hierarchy. So the processing order is as follows:
default.properties, followed by its includesproject.properties, followed by its includestest.properties(or any other test-run-specific properties file), followed by its includesdev.properties, followed by its includes (in development mode only)secret.properties, followed by its includes
Includes will be resolved according to these rules:
- Each property include will be processed recursively in depth-first mode.
- If the include target is a directory, the properties files contained in that directory are processed in alphabetical order.
- If there’s more than one property include in a file, they will be processed in ascending order sorted by their index.
During that process, properties read in later will overwrite already existing settings.
Example
Assume the system under test is deployed to different environments, such as development, live, and pre-live. Each environment requires a different host in the start URL and different access credentials. Furthermore, different load profiles are required for certain types of load tests. Now assume the following directory layout in the test suite:
--+ <testsuite>
  |--- classes
  |--+ config
  |  |--- data
  |  |--- effectiveSettings
  |  |--+ environments
  |  |  |--- development.properties
  |  |  |--- live.properties
  |  |  |--- pre-live.properties
  |  |  `--- test.properties
  |  |--+ loadProfiles
  |  |  |--- smallLoad.properties
  |  |  |--- halfLoad.properties
  |  |  `--- fullLoad.properties
  |  |--- default.properties
  |  |--- project.properties
  |  `--- test.properties
  |--- lib
  |--- results
  |--- scripts
  `--- src
As you can see, the load tester has prepared a property set for each environment and each load profile under the config directory. With these predefined property files, you can easily mix and match the environments and the load profiles as needed. For example, add/modify the following lines to your test.properties to apply the full target load to the pre-live environment:
com.xceptance.xlt.propertiesInclude.1 = environments/pre-live.properties
com.xceptance.xlt.propertiesInclude.2 = loadProfiles/fullLoad.properties
Alternatively, you may also define a certain directory to be always included:
com.xceptance.xlt.propertiesInclude.1 = effectiveSettings
To apply a certain combination of settings, simply empty this directory first and copy the respective predefined property files to this directory (pre-live.properties and fullLoad.properties, for example).
Additional Configuration Files
In addition to the files described above, you can find three other files in <testsuite>/config/:
dev-log4j.properties: log4j logger settings used in development modelog4j.properties: log4j logger settings used in load test modejvmargs.cfg: JVM settings for the agents and therefore only used in load test mode, e.g. settings for Java garbage collector tuning
Also see “Apache Log4j API Docs”:http://logging.apache.org/log4j/1.2/apidocs/index.html for more information on log4j settings.
Property Replacements
In all XLT properties files, you can work with property replacements based on a ${} syntax. You can define a property and then assign a value to another property by referring to the first property.
This is especially convenient for project.properties where properties are often defined for each test case to gain flexibility, but where, for example, the login data is identical for all test cases by default.
username = MyUsername
password = MySecretPassword
com.xceptance.xlt.samples.tests.TSearch.username = ${username}
com.xceptance.xlt.samples.tests.TSearch.password = ${password}
com.xceptance.xlt.samples.tests.webdriver.TSearch.username = ${username}
com.xceptance.xlt.samples.tests.webdriver.TSearch.password = ${password}
Resolving Property Keys
When a test case reads a certain setting from the configuration – let’s say userName - the framework uses a fallback strategy when running the property look-up. The strategy performs also a look-up step, based on the transaction name (the short name to which the full class name is mapped).
TMyTestCase.userName = john # property name qualified by transaction name
com.company.tests.TMyTestCase.userName = john # property name qualified by full test class name
userName = john # plain property name
This lets you parameterize different transactions differently, even if they are mapped to the same class and therefore share the same code. The look-up will take place in this order, from a very narrow scope (the transaction) to a wide scope (a general property).
Scenario-specific overrides of framework properties
The XLT framework provides a lot of settings to influence the behavior of your test cases. Usually, you will configure these globally, so the behavior was changed the same way for all test scenarios at once.
While this makes sense most of the time, there are use cases where scenario-specific settings are advantageous. For example, if you mix different types of test cases in a load test (Web interface tests and API tests), you may only want the Web tests to simulate a “user think time” between actions. Such a scenario-specific configuration is possible now for many framework settings. See the table here for more information.
For a scenario-specific configuration, XLT requires you to prefix a framework property name with the scenario name or class in the settings of your test suite. Let’s use the think time between actions as an example:
com.xceptance.xlt.thinktime.action = 5000
TOrder_DE.com.xceptance.xlt.thinktime.action = 10000
posters.loadtest.tests.TRestApi.com.xceptance.xlt.thinktime.action = 0
In this case, the general think time is 5,000ms, but will be 10,000ms for TOrder_DE and 0ms for TRestApi.
When looking up a property value for a scenario, XLT tries the following alternatives in this order:
- <scenario-name>.<property-name> - the property name prefixed with the transaction name (or the simple test class name if no transaction name mapping is present)
- <test-class-name>.<property-name> - the property name prefixed with the fully qualified test class name
- <property-name> - the bare property name, without any prefix
Please check the full list of currently supported framework properties and their default value in the release notes.
Secret properties take precedence
Secret properties always take precedence over their public counterparts. This holds true for the framework properties as well as their scenario-specific overrides.
Example
credentials.user = testUser
secret.credentials.user = admin
TOrder_DE.credentials.user = orderUser
secret.TOrder_DE.credentials.user = secretOrderUser
Depending on which property key is requested in which context, different values may be accessed:
Test classes OTHER THAN TOrder_DE:
credentials.user->adminsecret.credentials.user->admin
Test class TOrder_DE:
credentials.user->secretOrderUsersecret.credentials.user->secretOrderUserTOrder_DE.credentials.user->secretOrderUsersecret.TOrder_DE.credentials.user->secretOrderUser
Best Practice
Newly developed test code SHOULD always request the form secret.property for properties that are likely to carry secrets. This ensures that the property value will only ever be available as a secret property, whether from the framework or scenario-specific properties (i.e. a public scenario-specific property WILL NEVER override a secret global property if the code requests the secret value).
Configuration for existing scenarios SHOULD be moved to secret properties where appropriate. Due to the override rules changes in the test code are not necessary.