Projects
Organizations are containers for projects, which in turn are the containers for any kind of test run in XTC.
XTC Project Types
Projects can either be of type monitoring or load test. They have a different set of properties depending on their nature.
In short, Load Test Projects are used to perform a number of load/performance tests, each of which can be configured individually (e.g. for gradually increasing the load applied to the system). XTC will save the results and generate performance reports for each load test it runs, so you have test management and evaluation conveniently available in one place.
Monitoring Projects contain a number of test scenarios that are repeated periodically to monitor the reliability and performance of an app over a longer time period including but not limited to functional monitoring of production environments. You may define criteria which will be validated during the scenario execution (runtime limits, error thresholds etc.) - violation of these causes notifications to be sent (you may define how and to whom).
The project type will be indicated in the project tile:

A monitoring project on the dashboard of the Xceptance organization.
The project menu on the left side will look a bit different depending on whether you are currently viewing a load test project or a monitoring project:
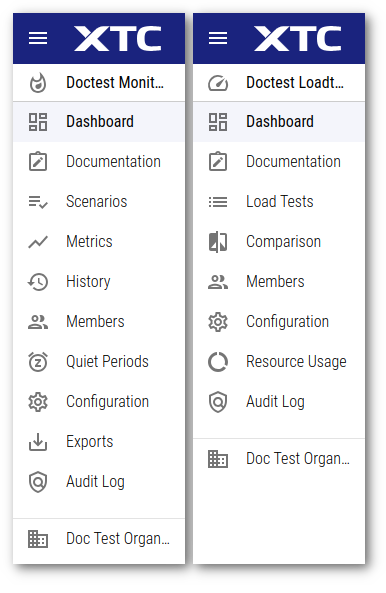
The menu of a monitoring project (left) and a load testing project (right).
Every project can be assigned its own set of members and configured independently of any other project in the organization.
Creating a New Project
To create a new project within an organization, navigate to this organization and select Projects in the menu on the left.
You will be shown a list of the projects in this organization:
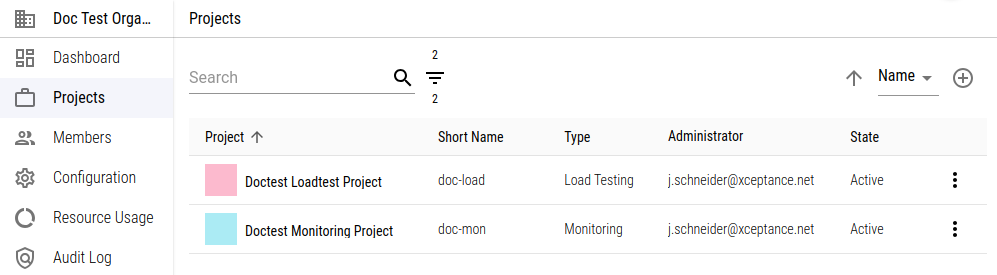
A list of projects in an organization, as seen by the organization administrator.
By clicking the + button top right, you will see a popup menu to add either a Monitoring Project or a Load Testing Project. The project nature can not be changed once the project was created.
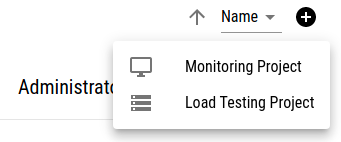
Adding a new project
On creating a new project, you will then be prompted to enter a name and a short name for the new project. The short name must be unique within the organization, must start with a lower-case letter, followed by at most 39 lower-case letters, digits and hyphens, and must not end with a hyphen.
All information but the short name can be updated using the context menu on the right of the project name in the project list, selecting Edit.
You can also create new projects by selecting Duplicate in the context menu of any existing project - this way, you can easily apply the configuration of an obsolete project to a new one.
On duplicating a project you will have to update at least the short name to be unique across the organization. The duplicated project will then be copied including its entire configuration. Please note that the duplicated project will need to be activated explicitly though (by clicking Edit in the new project’s context menu you can change the state from Locked to Active).
User Roles Within a Project
A project’s creator is automatically an administrator in this project, and as such can add additional user accounts as members of project. These do not necessarily need to be members of the organization already, but will implicitly be added as guest members to the organization when added to the project (independent of their project role).
Project members can have one of the following roles (which are not necessarily identical to these users’ organization role):
- a guest has only permission to view the project dashboard,
- a reviewer can view load tests and load test details (for load tests) or results and history (in monitoring),
- a tester may create, configure and run load tests or view logs and configuration of monitoring projects,
- a test manager is additionally allowed to edit most of the project configuration for load test projects as well as monitoring projects, and
- a project administrator has the complete set of permissions, including editing the project members.
(Permissions increase in order of the list, i.e. a tester has the same permissions as a reviewer plus some in addition to that.)
If you are logged in and are currently viewing a project, your project role will be displayed at the bottom right in the footer:

Footer displaying the user’s role in the project.
Adding and Removing Project Members
To add new members to the project, navigate to the project and select Members in the menu on the left. You will see the list of project members, and by clicking the + sign in the top right, you can add new members by typing the name (mail address) of their user account and assigning one of the roles from above.
By default, you can only assign users who are already members of your organization. If desired, you can invite users who either don’t have an XTC account yet or are not part of your organization.
If you want to add multiple users at once, simply paste a list of e-mail addresses (separated by comma, newline or space). All users will be assigned the same role.
To update a user’s role within a project, go to the project members list and click the context menu right of the user name, then select Edit Role. You can then pick a new membership role.
To remove members from a project, go to the project members list and click the context menu right of the user name, then select Remove (you will be prompted to confirm the deletion).
Please note that after removing members from the project, they are not automatically deleted from the organization as well, but will remain there until you explicitly remove them from the organization.
Inviting Users to Join a Project
As a project admin you may invite users who do not have an XTC account or are not part of the project’s organization yet to join your project in XTC (if this feature is enabled for the organization). Simply add these users to your project as usual, but make sure you activate the Invite Users toggle.
Previously unregistered users invited this way will receive an email with a link to complete their registration (provide name, password, etc.). Once this is done, they will be automatically added to the project’s organization as Guest members (just like previously registered users), and are then all set and ready to participate in the project.
Invitations are valid for 30 days. Project administrators may resend the invitation for an invited user from the Members page at any time. Users who have once been invited to join a project, but have not completed the registration process, will be automatically deleted after 90 days.
Project States
Projects may have three different states that influence not only what can be done with them, but also whether the project is visible at all.
- Active – The project is visible to all project members. They can interact with the project as allowed by their roles. This is the normal state while people work actively on the project.
- Inactive – The project is visible to all project members, but the project is effectively read-only. No object can be created or modified. In monitoring projects, scenario execution is halted, while in load testing projects, no load tests can be started. Resources shared with other people stay shared. Set a project to inactive if the work is done but you still want members to be able to recap what has been done and review the results.
- Archived – The project is effectively invisible. It will be displayed neither on your dashboard, nor in the project drop-down in the page header. Shared resources (reports as well as results) will be unshared, so share links will become invalid. No data will be deleted. Set a project to archived if the project is complete and members won’t need to look into it any longer. When a project is archived, XTC will notify all project members via email and, if set up, Slack as well. Archived projects are no longer shown on the main dashboard or in the project selector in the page header.
The state of a project can be altered as follows:
- A project administrator may toggle the state of the project between active and inactive. In the project, go to Configuration > General > Project State and edit the state as needed.
- An organization administrator may set all three project states. In the organization, go to Projects, click the Change State menu item in the 3-dot menu of the project in question, and set the state as needed.
You can change the state of a project at any time. For example, if a project needs more work, it can be set to active again, no matter whether it’s inactive or even archived.
Note that the new project states do not influence the base fee for a project. This fee will apply to any state.
Deleting a Project
You can delete a project by going to the Projects overview of the organization, then click the 3-dot menu of the project in question and select Delete. You will be asked to confirm this action by typing the project name.
Please note that deleting is only possible for active or inactive projects on the organization page. Archived projects can not be deleted.
Project Documentation
Every XTC project has a documentation page (accessible via side navigation). Use this page to share general information about the project with other project members, such as test goals and success criteria, test windows, contact information, news, etc. The content of the page can be nicely formatted using Markdown.
Since almost everyone in your project can view the documentation page, make sure you don’t share sensitive information such as login credentials.