Scenario Setup
Setting Up Monitoring Scenarios
The basis for all monitoring scenarios is a set of XLT test cases that will be run continuously. These tests are preferably organized in a test suite, which is located in the repository you defined in the monitoring project configuration.
XLT tests are basically Java classes containing JUnit tests. These classes will be built by XTC so it can then run the test scenarios contained in them.
Defining Scenario Defaults
In the Scenarios section you will find two tabs: Scenarios, which allows you to manage the monitoring scenarios for your project, and Scenario Defaults, where you can define default settings to be used for all monitoring scenarios. These defaults can be overwritten for each individual scenario. To view or edit scenario defaults, use the toggle on the right to expand the default section, where you will find one or more editing buttons next to the settings:

The scenario defaults tab with expand toggle and editing button.
Execution
In Execution you define where and how the scenarios should be executed:
- you define an interval (how often a scenario should be started, e.g. every minute),
- the retry behavior (retry can be active/inactive, and if it is active you can define the interval, i.e. after which time period the scenario shall be retried, and a count, i.e. how many retries are allowed before the scenario counts as failed),
- what the maximum runtime for a scenario is (if this time is exceeded, the scenario will be aborted), and
- the locations to run the scenario from (available locations will depend on the location of the machines that were provisioned for your monitoring project) - you may show or hide locations of unprovisioned machines here).
Properties
In Properties you may add test properties to use for scenario execution. These properties may be entered as free text, so make sure your input is valid!
Notifications
In Notifications you can manage the notification recipients or temporary disable notifications. You will find a toggle to deactivate notifications completely (this can be overwritten in each individual scenario). For active notifications you may define
- a Send Threshold, i.e. a fail count (how many executions must fail to send a notification) and the number of considered executions (how many of the last executions should be considered to validate the fail count against, e.g. if the fail count is 2 and you consider 2 executions, a notification will be sent if two consecutive executions fail, but if you consider 5 executions for the same fail count, a notification will be already sent as soon as two out of five consecutive executions fail),
- a Reply-To Address (the default reply address for received notification mails - if none is set this is a no-reply service address, so we recommend using any sensible contact in your project for this), and
- a Subscription List, which consists of one or more recipients for your monitoring notifications, which may be added as a user (project member with predefined mail address) or a custom entry (custom mail address or phone number). For each subscriber you may choose whether to send notifications via e-mail or text message (or both). The subscriber data can be edited anytime, subscribers can also be deactivated or removed entirely.
Criteria
The most crucial part of the settings is to define criteria which will be validated during the scenario execution. Violations cause the scenario to be treated as failed. You may define several criteria, each of which will be validated individually (i.e. if one criterion fails, the scenario will be treated as failed and a notification will be sent).
You may add criteria by clicking the + symbol at the top of the list. You can then pick a criterion to use from a given list (e.g. Maximum Request Runtime, or Maximum Request Errors) and define a threshold for this criterion.
Managing Existing Scenarios
In the Scenarios tab you may manage the monitoring scenarios of your project, add new scenarios, edit settings for the existing ones or delete them if they are no longer needed.
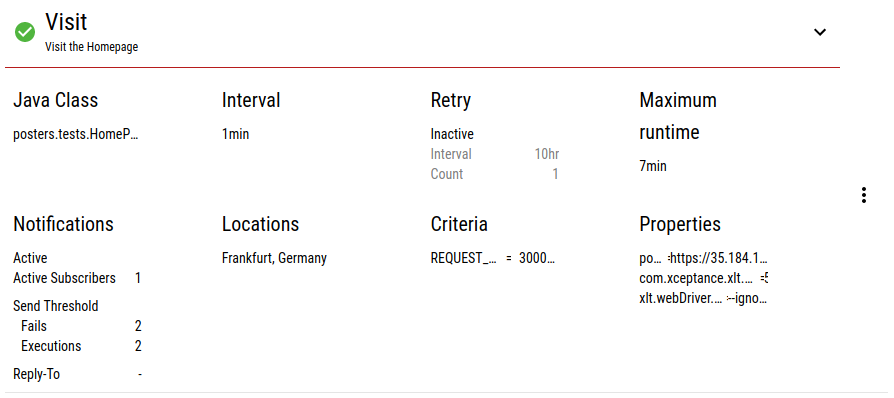
You can open an overview of a scenario’s current settings by clicking the scenario name or the expand button right of the scenario row in the list:
Expanded scenario information in the scenarios list.
By selecting “Edit” from the menu in the right of the scenario row, you can adjust the scenario settings as needed. Otherwise the scenario defaults will be used. The settings we explained in scenario defaults are available for each individual scenario, and in addition you have the basic scenario settings in General (scenario name and description, and the Java class containing this scenario).
Scenarios with overwritten settings are indicated by a small “(Defaults overwritten)” note next to the scenario name. In the settings overview, the overwritten scenarios are highlighted in blue:

Scenario information containing an overwritten setting.
If you do not need a scenario you can disable it temporarily or delete it entirely by choosing these actions from the scenario’s context menu.
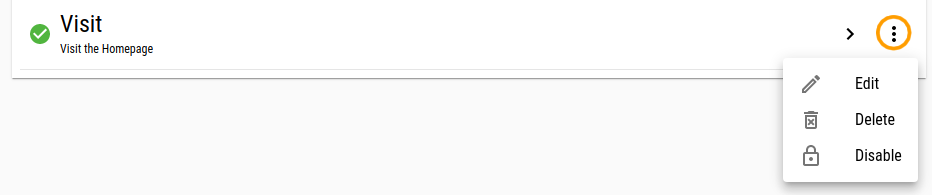
The context menu for a monitoring scenario.
Adding a New Scenario
To add a new monitoring scenario to your project, just click the + button at the top of the scenarios list. You will be asked to enter a Name (which must be unique across all scenarios in this project) and Description and, most importantly, the Java Class (including class path) in your repository that contains this scenario as a JUnit test case.

Creating a new monitoring scenario.
The new scenario will now show up in the list. It will be enabled by default and it will automatically use the scenario default settings. You can now adjust these settings as needed by editing the scenario.
New scenarios are disabled by default you time to finish customizing the scenario settings. Don’t forget to enable the scenario when done.